What is Visual Selector?
Table of Contents:
- What is Visual Selector?
- How to monitor parts of a web page using Visual Selector?
- How to expand and narrow selections?
- How to exclude elements from the selection that you do not want to monitor?
- How to use Text filter in Visual Selector?
- How to monitor Attribute and Property value for the selected element?
- How to modify selections of an existing monitor?
- FAQ
- How to monitor changes in the image?
- How to monitor changes in links or anchor tag’s href?
- How to monitor changes in button color?
- How to add a delay for webpages that take a longer time to load?
What is Visual Selector?
The visual selector allows you to select specific parts of a webpage for monitoring. Once the selections are saved, Distill monitors them at the configured check interval.
Distill supports three types of selectors - XPath, CSS, and JavaScript. When you select parts of a page, Distill will generate its corresponding XPath or CSS selector and save it. By default, Distill creates CSS selectors (XPath in case of browser extensions) on visual selections. JavaScript selectors are manual selectors that you can use with your created selector.
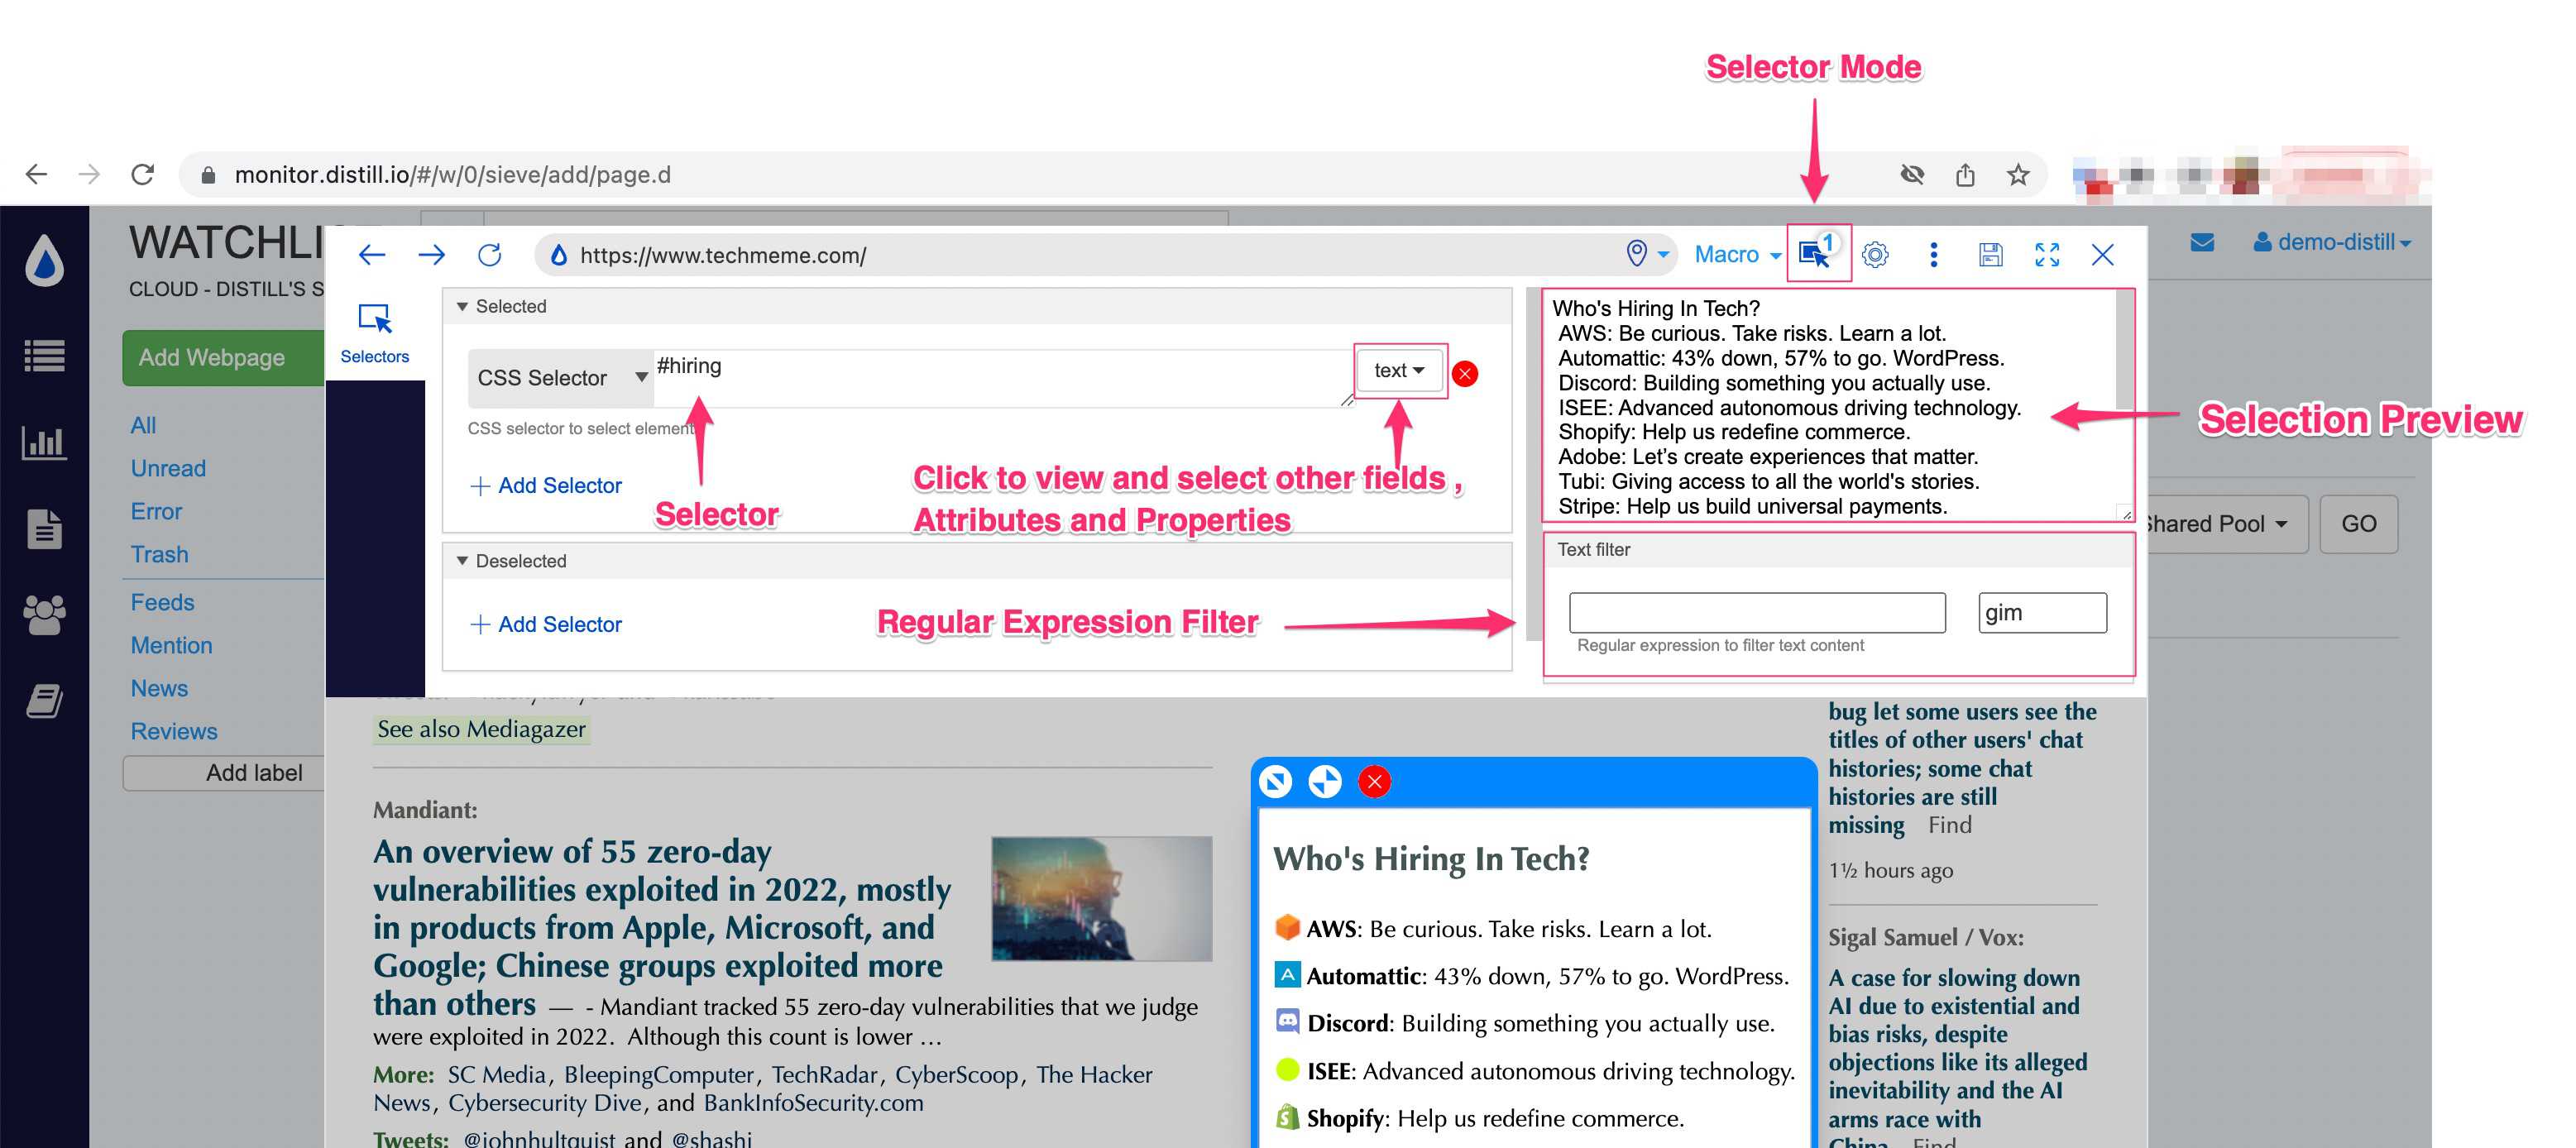
Visual Selector toolbar loads at the top (bottom in case of browser extensions). The following image shows the visual selector panel in the web app. You can click on the cog icon to view the visual selector panel in the web app.

How to monitor parts of a web page using Visual Selector?
Following are the steps that you can follow to make selections on the page using the Web app.
Step 1: Click on “Add Webpage” from the Watchlist. It will open the Source page.
Step 2: In the Source page, enter the URL and click on “Go”. Profiles and Proxies are optional field that you can add later on if necessary.
Step 3: Selector mode is “ON” by default. You can click on sections of the page to make selections. You can select multiple elements, expand/narrow selection, and also exclude elements if you do not want to monitor certain elements. You should be able to see the selection preview with the text content.
Step 4: Click on the “save” button.
How to expand and narrow selections?
If you find it difficult to select a large section of a webpage by clicking directly on it, you can try starting with a smaller section. And then using the “expand” icon you can increase your selection. Similarly, you can use the “narrow” icon to fine-tune your selection and the “delete” icon to remove it, if necessary.
In case the actions are not visible, you can click on the right caret icon that encircles the selection, as illustrated below.
 Once the actions show up, you can click them to use it.

How to exclude elements from the selection that you do not want to monitor?
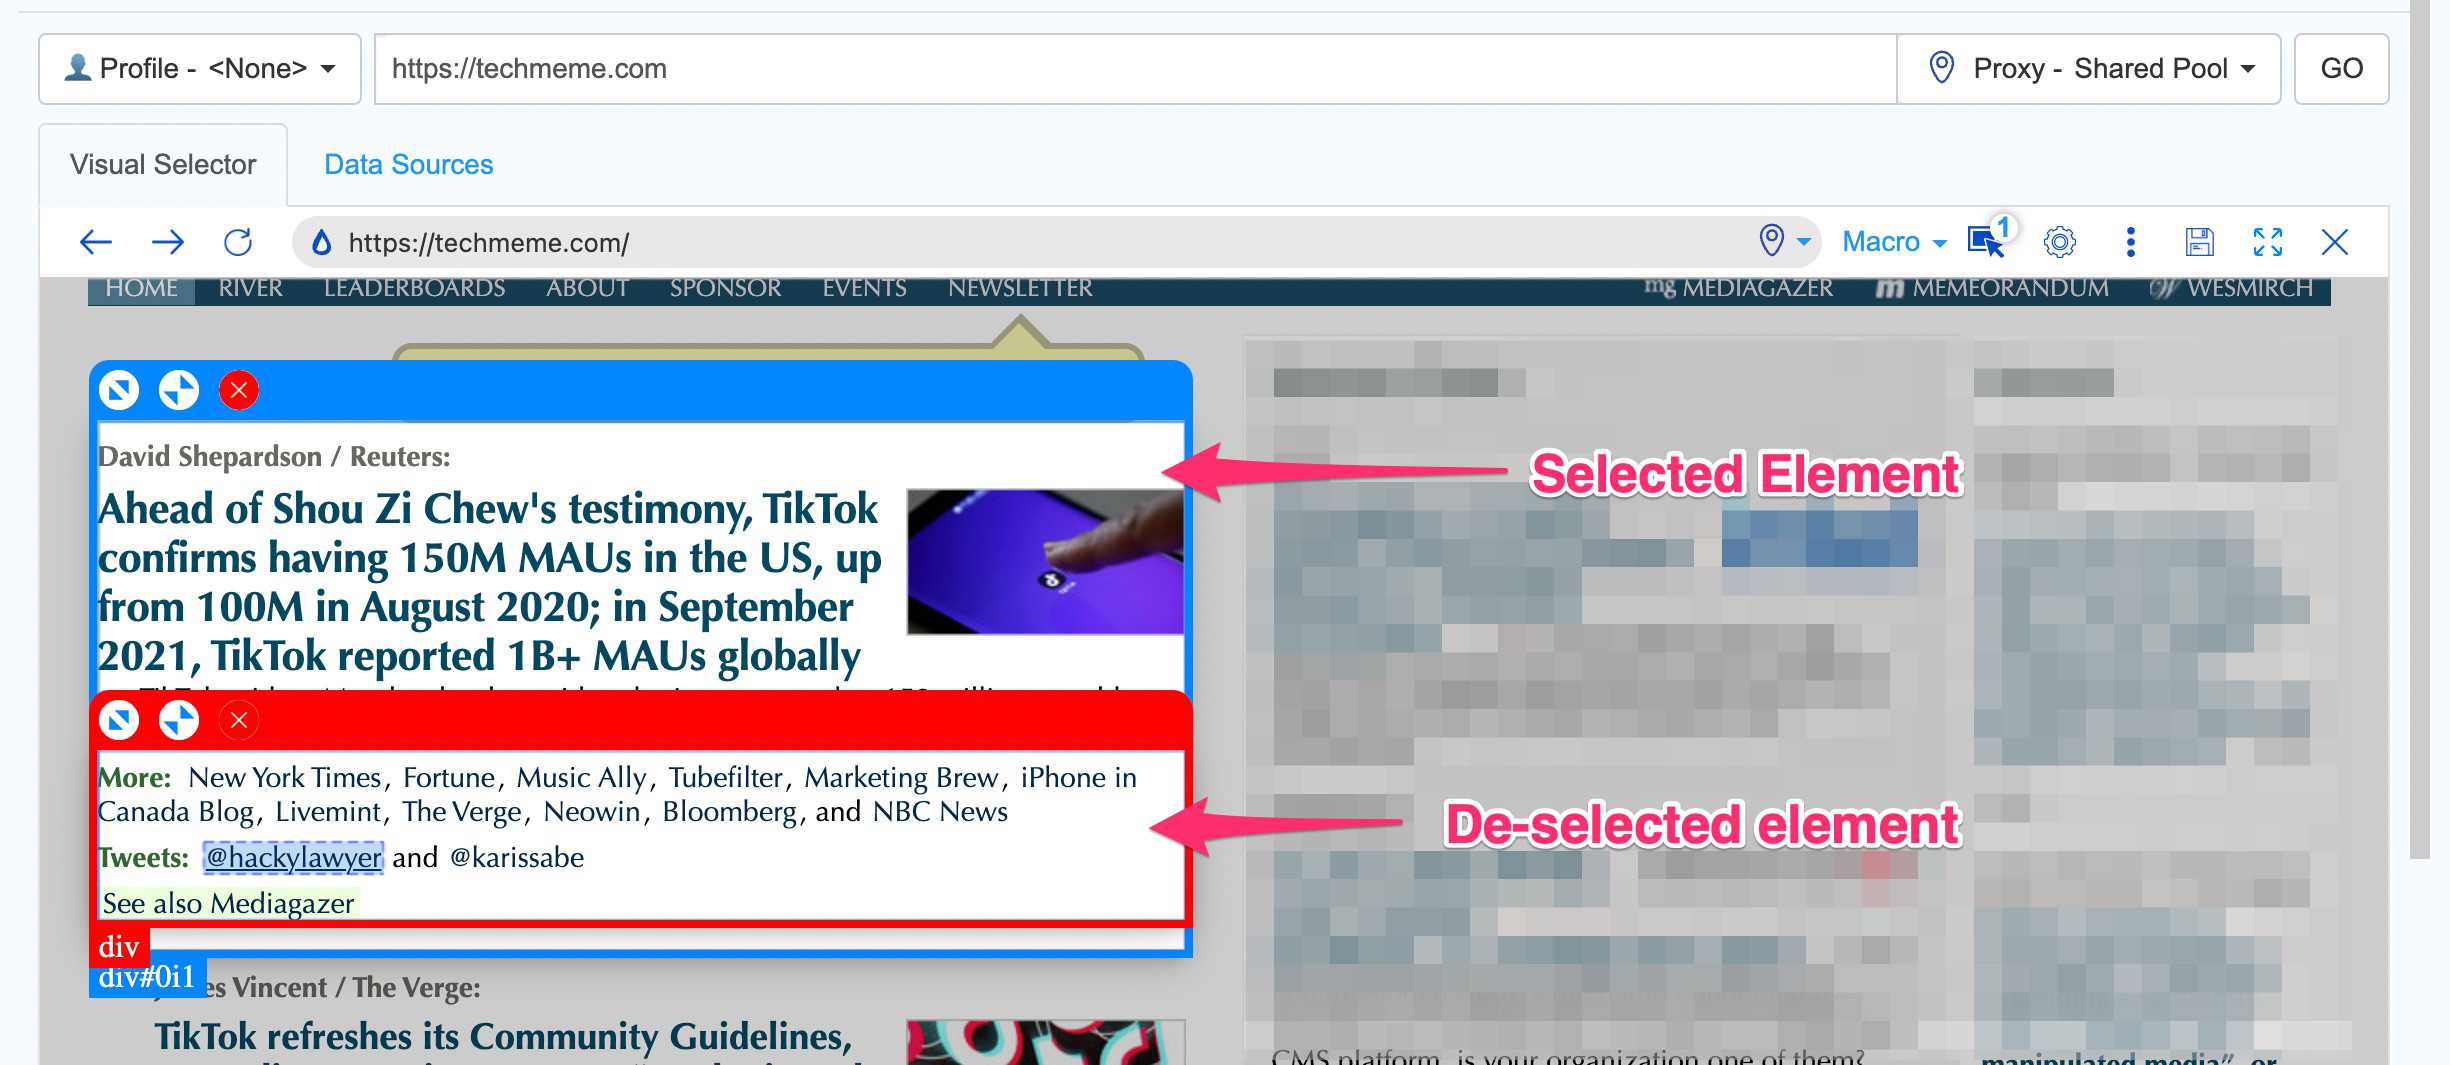
You can make selections inside an already selected element to exclude elements. Excluded elements are not monitored.
If using the web app visual selector, you will see the selected elements enclosed in the blue border box and excluded elements in the red box. If using the browser extension, selected elements will show enclosed in a black bordered box.

How to use Text filter in Visual Selector?
Distill supports Regular expression filter. You can use it to extract specific patterns of characters, such as numbers or phrases, from the selection. For example, if you want to extract only the numeric texts from the selection, you can use \d+ as the regular expression.
This feature is available in the visual selector panel. If the visual selector panel is not showing up in the web app, you can click on the ‘cog’ icon to expand it.
The following image shows a selection with numeric and alphanumeric text. Using the regular expression, numeric content has been filtered for monitoring.

Please note that Distill uses a JavaScript version for Regular Expression. gim are flags. You can set the flags as per your requirement. By default, all flags are set.
The flags have the following description:
g: Perform a global match. If set, it will find all matches and will not stop after the first match. You can use this if there are multiple selections and you want to apply the same text filters for all.
i: Perform case-insensitive match.
m: Perform multiline matching.
You can also validate your RegEx by testing at regex tester sites. Some of them are: https://regex101.com/, https://www.regextester.com/. Distill uses JavaScript language.
How to monitor Attribute and Property value for the selected element?
By default, Distill monitors text changes of the selected element. You can also monitor selected element’s attribute and property values. The attribute and property fields show up once you select elements on the page. You need to check/select the fields that you want to monitor. These field values are saved as text and will show up in the selection preview. You can navigate to change history to see changes in the text in details.

How to modify selections of an existing monitor?
Here are the steps that you can follow to modify the selections:
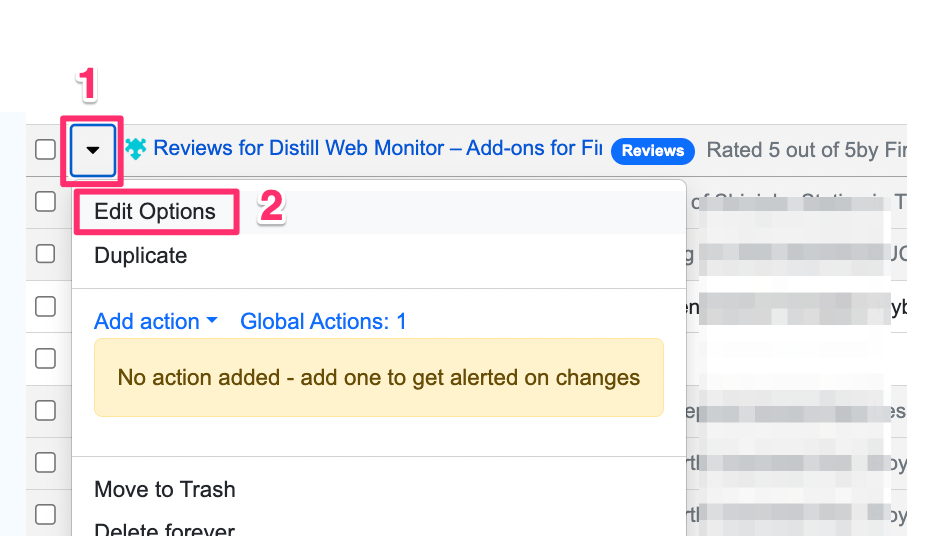
- Go to the monitor’s Options page by clicking on the downward-facing caret icon, which is located to the left of the monitor. Then select ‘Edit Options’ from the context menu.

- Click on the “Open Webpage Selector” option under the Source. It will show the URL bar with the URL, Profile and Proxy.
- Click on the “Go” button.

- It will load the page with the existing selection. You can also click on the “selection icon” present at the left to the cog icon to toggle it (ON/OFF). You can modify/add/delete the selections at this stage when the selector mode is ON.
- You can click on the cog/settings icon to see the existing selector. You can modify/add/delete the selectors manually in the selectors view.
FAQ
How to monitor changes in the image?
In most cases, when there is a change in an image, the source link also changes. You can monitor the source link of the images.
- You can select the image from the webpage.
- Select the
srcfield from the field option. You should be able to see the src value in the selection preview section. - Save and Done!

How to monitor changes in links or anchor tag’s href?
You can select the href attribute to monitor changes in the link. You can follow the above-mentioned step for image monitoring and select href from the field.
How to monitor changes in button color?
Many webpages use attribute class to show button color. For example, they can add a “disabled” class to show a disabled button when an item is not available. You can monitor the class attribute along with the text to monitor such cases.
How to add a delay for webpages that take a longer time to load?
- Navigate to the monitor’s Options page, as shown in the figure below:

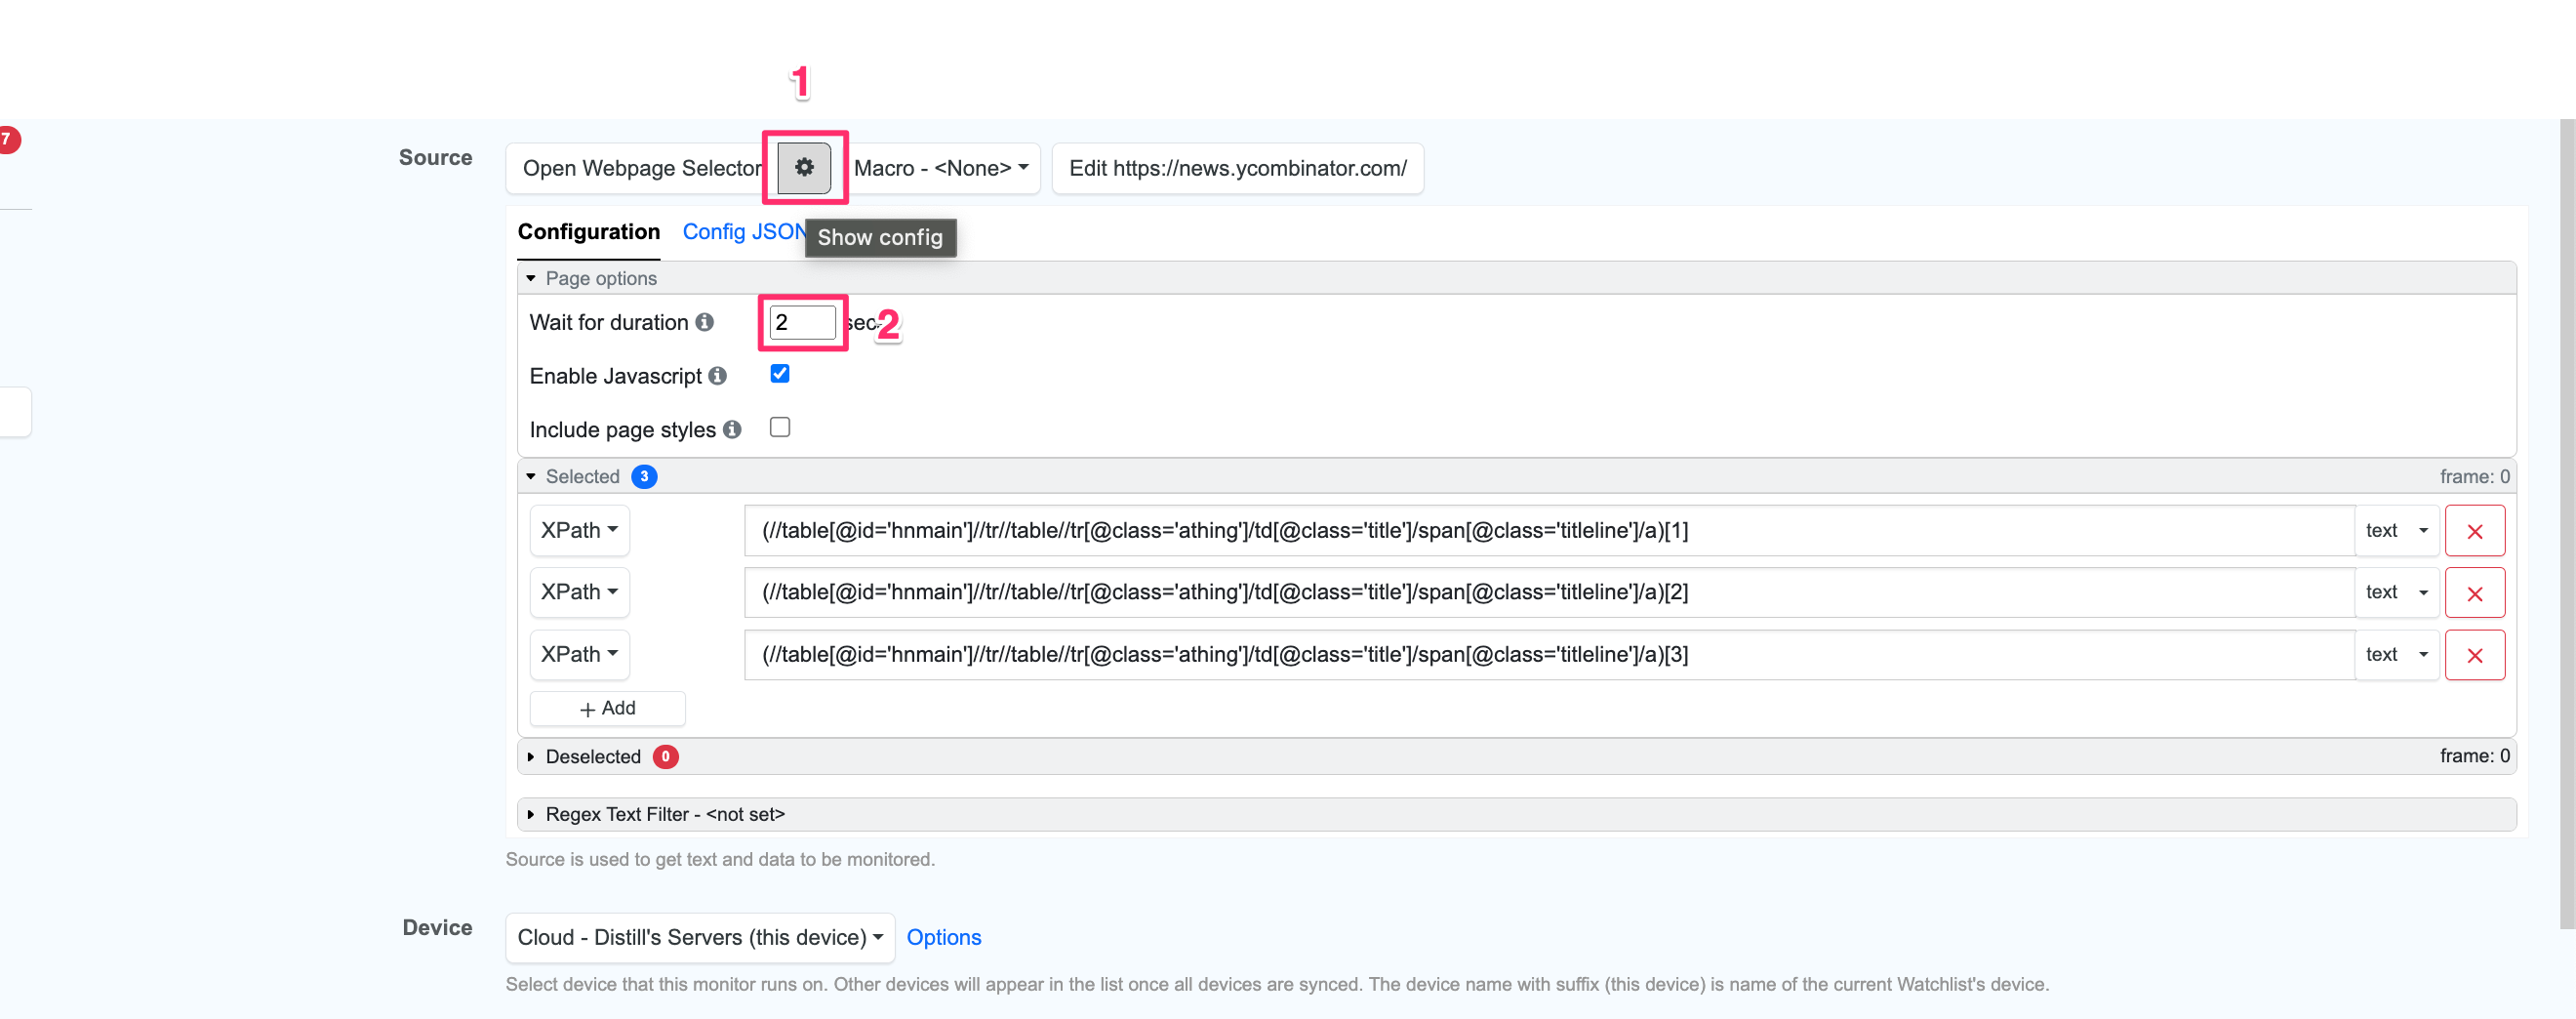
- Click on the “cog” icon from the Source to access its configuration:

- In the configuration section, update the value for “Wait for duration”. You can set it to a maximum of 30, depending on your requirement.
Here’s a video that will guide you on how to use the visual selector for making selections on webpages.
 Distill