Macro: Record and Replay Automated Actions
The Starter plan and above include Macros.
What is a Macro in Distill?
Macros allow you to record a sequence of actions performed on a web page. Some examples of webpage actions are scrolling, button clicks, or form submissions on the page. Once you record the Macro, you can replay it on the webpage.
In Distill, you can use Macros in two ways:
- For monitoring the desired section of the webpage, where the content displays only after performing web page actions (button click, scroll, etc.).
- As a Macro action after Distill checks the web page for changes. When Distill detects a change in your monitor, the Macro will replay the actions on the web page.
Use macros when the page URL doesn’t change after actions like submitting forms, sorting, filtering, logging in, or searching. Macros can replicate these actions, taking you to the desired page view.
You will need to follow two steps for monitoring webpages that need Macro:
- Create a Macro that records the flow of actions on the web page.
- Use the saved Macro and play it before monitoring the section on the web page.
Here’s a video tutorial with an example showcasing how to create a macro, record actions, and use it on a webpage monitor.
How to create a Macro?
You can create Macros from the web app or the browser extension.
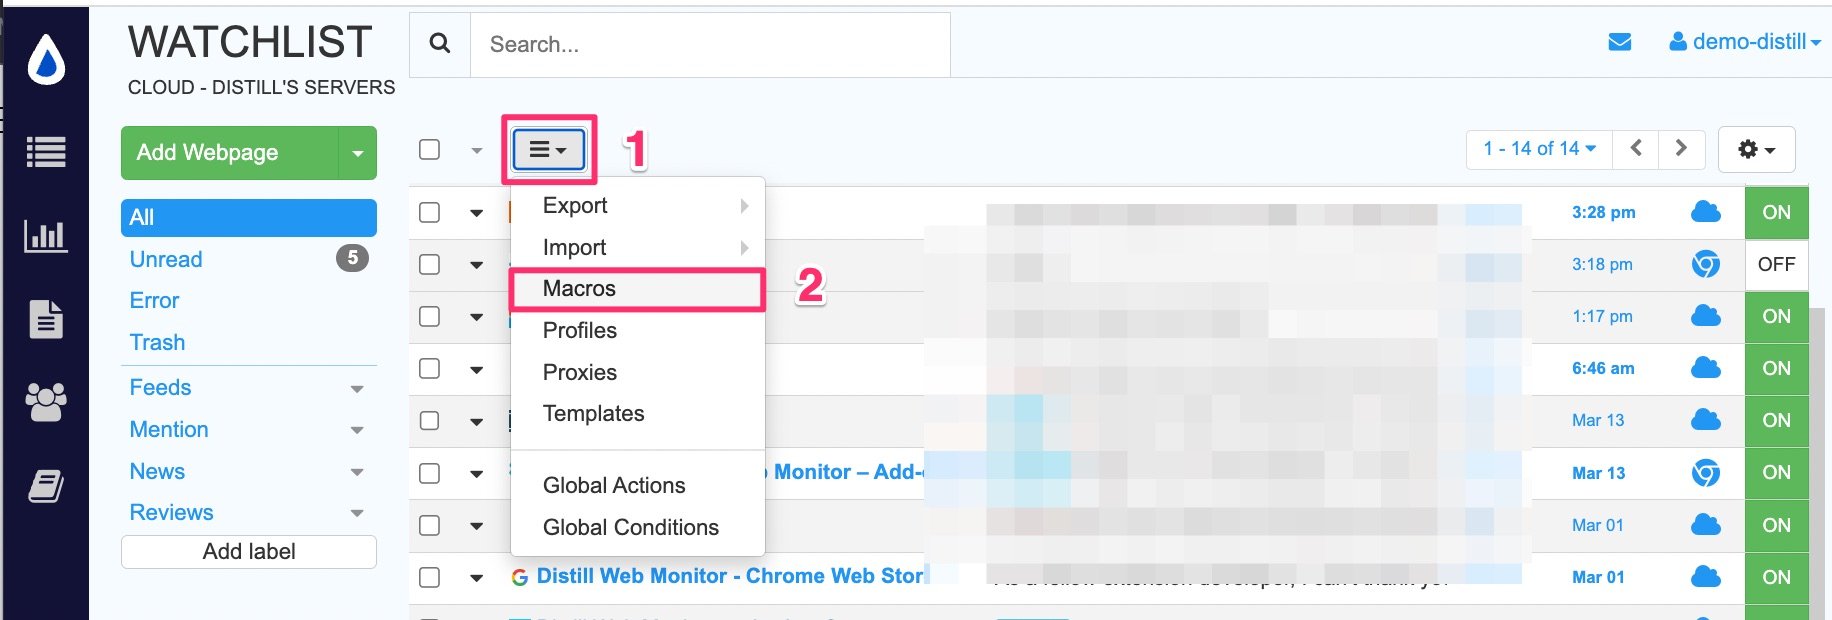
- Click on the Macros option from the hamburger icon ☰. This opens the “Macros” page at https://monitor.distill.io/#/w/0/macros/.
-
Enter the Macro Name and the URL in the respective placeholders and click the Add New Macro button. This opens the URL in Distill’s remote browser.
-
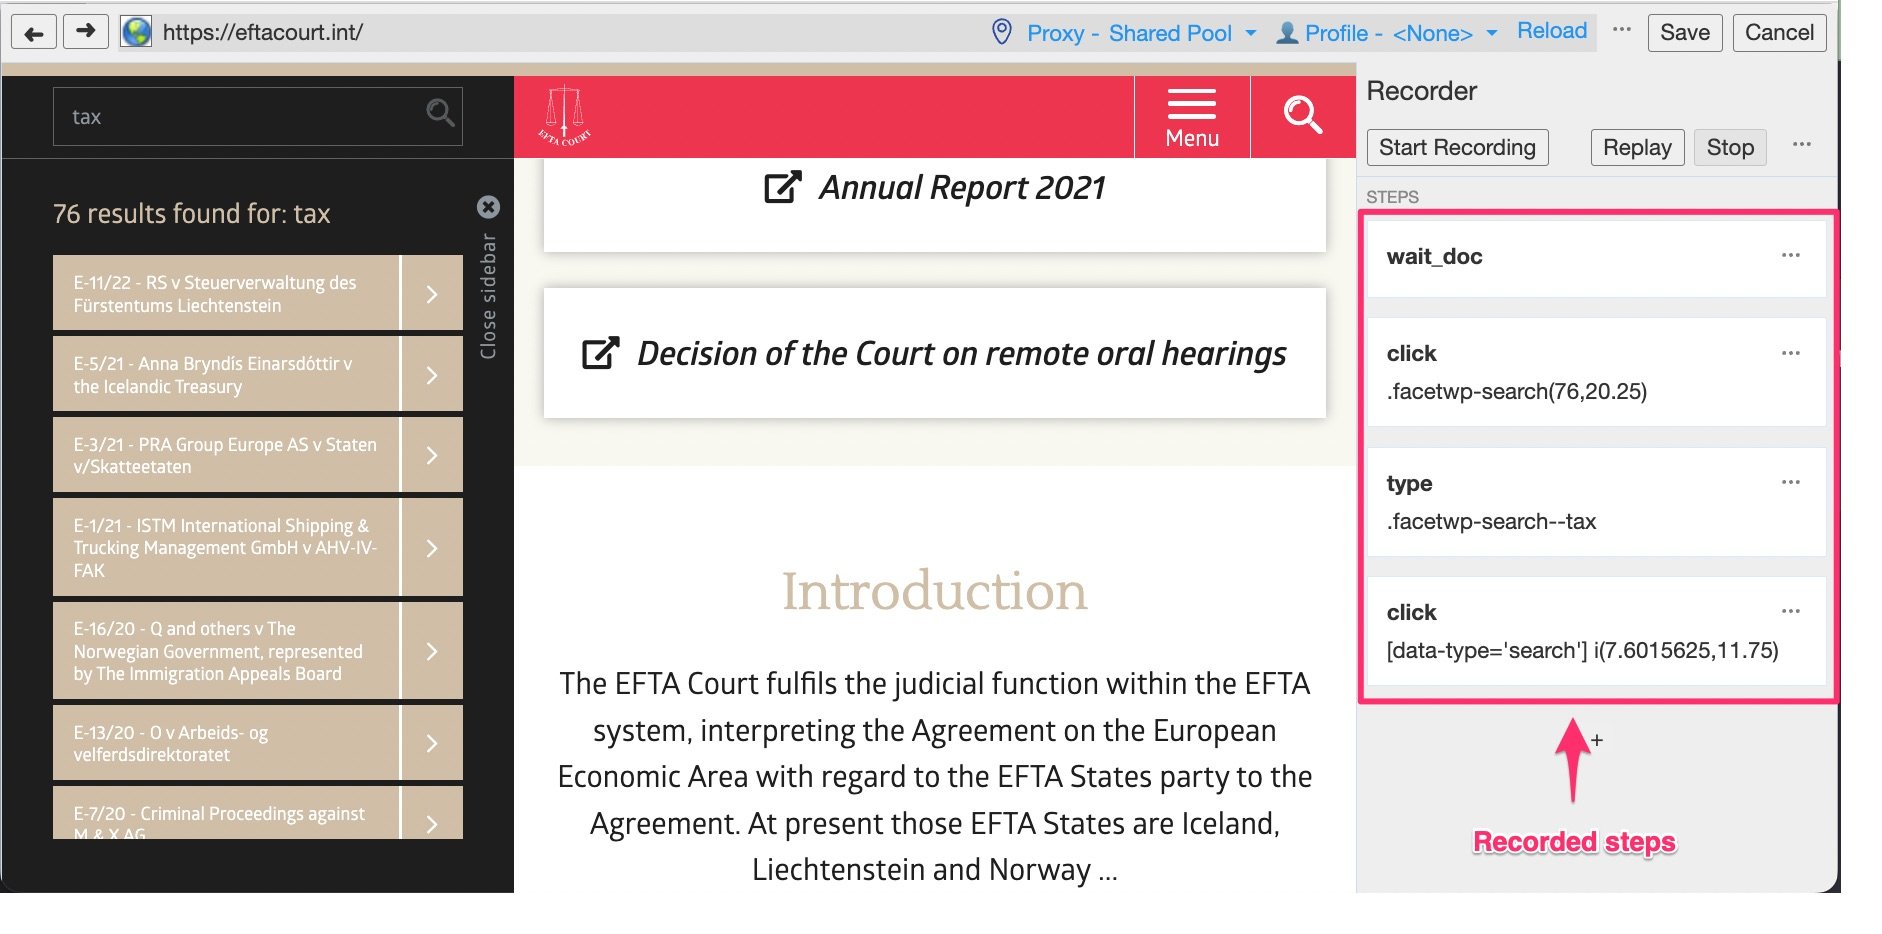
Once the page loads, perform the web page actions to display the final content. You will also see the corresponding steps for each action in the right panel as shown below.
-
[Optional] Click the Replay button to ensure that you have captured the correct flow of actions.
-
Click the Save button to save the Macro.
The Macro list opens after saving a Macro and shows the newly added Macro.
How to use a Macro for monitoring?
You can use a Macro to make selections on a page for monitoring. This will work for both cloud and local monitors. To use it for a local monitor, you will have to change the device from the Option page or the Watchlist.
Here are the steps to use a Macro:
-
Click the Add Webpage button from the Watchlist. Enter the URL and click Go.
-
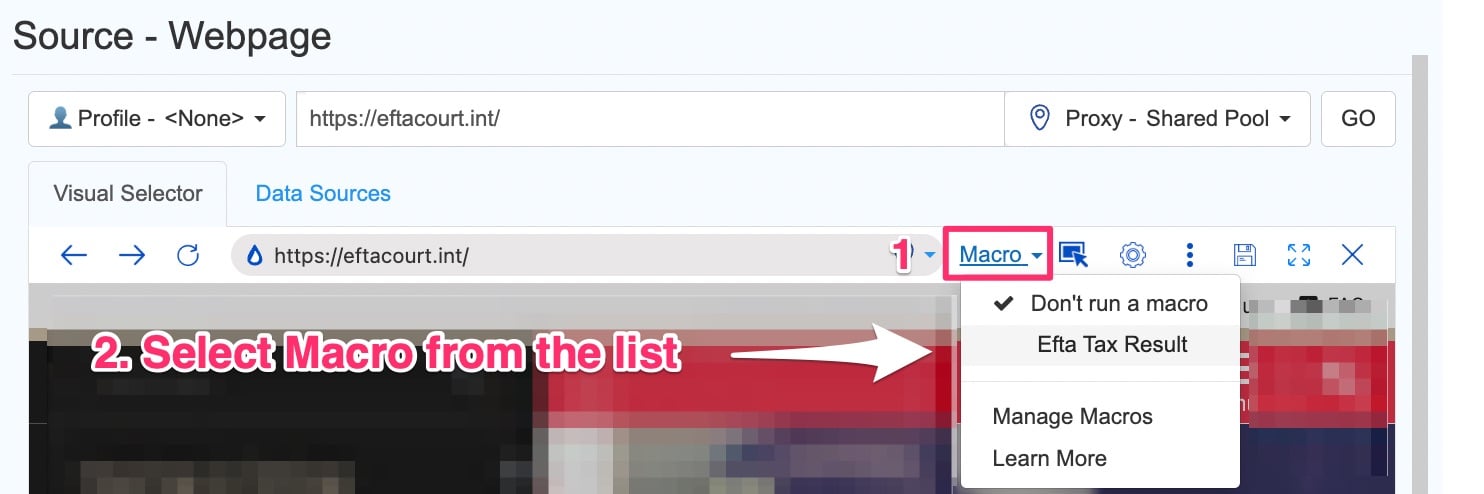
From the visual selector toolbar, click on the Macro menu option. This shows all the saved Macros for the URL. Select the Macro from the drop-down list.
-
Click the play button for the Macro. This plays the recorded actions and reaches the final page where you can make selections to monitor.

-
Once the Macro finishes playing, turn on the selection mode to make selections. Save the selections.

-
Configure the settings like check interval, device, and others from the Options page and click Save.
How to use Macro actions after checks?
Macro actions are available for local monitors.
You can set up Macro actions to replay a set of steps on a page once your monitor detects a change.
- Create a Macro as explained above to record the actions to be performed after the change is detected.
- Create a monitor for that web page by clicking on Add Webpage from the Watchlist.
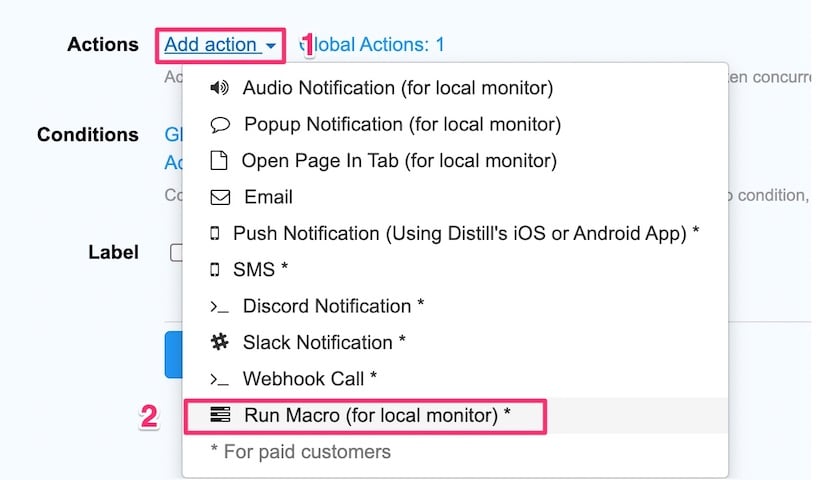
- In the options page, click on Add actions and select Run Macro (for local monitor) from the actions list.
Some common scenarios when you can use macro actions are:
- Automate adding items to cart when its available: You can set up a monitor to track a sold-out product. When the visual selector detects a change from “Sold Out” to “Add to Cart” on the product page, use Macro action to automate adding the item to your cart. It will open the page in a new tab and replay the actions recorded in the Macro.
Here’s a video tutorial with instructions to use macro actions:
-
Applying to a job opening: While tracking a careers page, if a role starts accepting applications, you can use Macro actions to apply for the job automatically.
-
Auto login: While monitoring pages that are accessible only when logged in, use a conditional block in a macro to check if the page displays a login form. If the login form is detected, the macro action will automatically log in to the page.
How to edit a Macro?
You can edit, add, or delete a step for an existing Macro.
- Navigate to the Macro list at https://monitor.distill.io/#/w/0/macros/.
- Click the Open Recorder button for the Macro that you need to edit.
- Click the overflow icon as shown below for a step and edit as needed. This opens a menu with options.
-
You have the option to Replace, Insert Step Before, Insert Step After, and Delete the step.
-
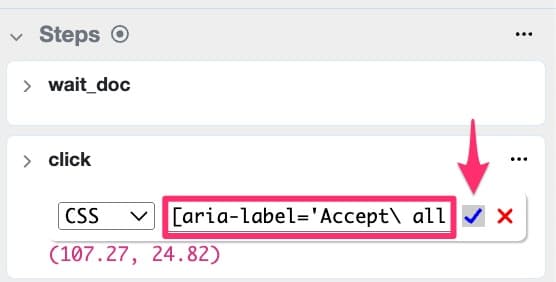
The properties and values associated with the steps are editable by clicking on them. Once edited, click the tick mark button.
Saved edits will apply to all the monitors using this Macro.
What are conditions in Macros?
Within the steps in the Macro, you can add a Conditional block (IF…ELSE). It allows you to execute specific steps based on whether a condition evaluates to true or false. It is similar to IF…ELSE structure in programming languages.
You can leverage Macro conditional blocks in several scenarios, including but not limited to:
- Managing Intermittent Pop-ups: You can use conditional blocks to handle pop-ups that appear sporadically. If a pop-up is detected, the macro executes a specified set of steps; otherwise, it continues with an alternate sequence.
- Ensuring Continuous Access: For pages requiring authentication, conditional blocks can automate the login process. This is especially useful if you’re monitoring a page and find yourself logged out.
Specifically, for local monitors tracking access to password-protected pages, you may encounter session timeouts that result in being logged out. In these instances, you can insert an IF…ELSE conditional block within your macro to check the login status. If logged out, the macro can automatically execute steps to log back in, preventing errors and ensuring continuous monitoring.
How to add conditions in Macro steps?
Steps to add if…else in the Macro recorder:
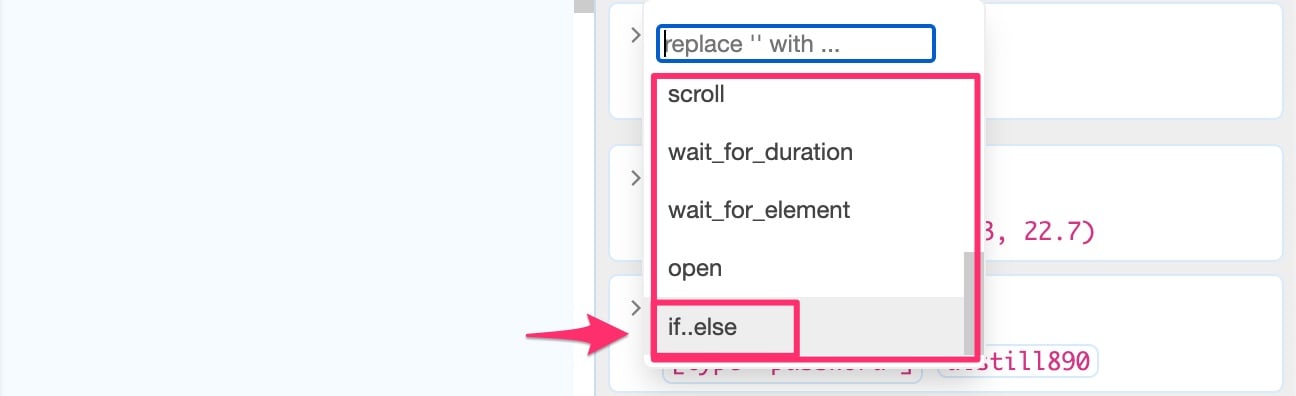
- Click on the action where you want to add a condition. It will open a drop-down with a list. Select if…else.
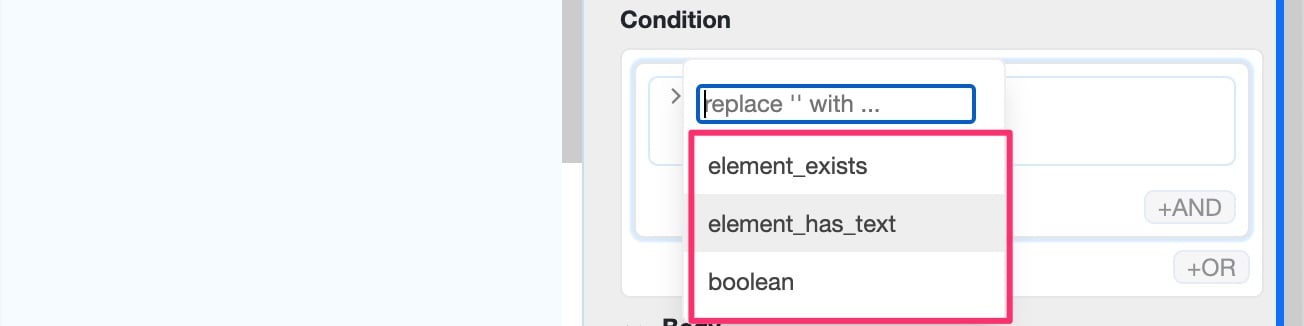
- IF block is added. Click the caret text to expand drop down that shows condition options.
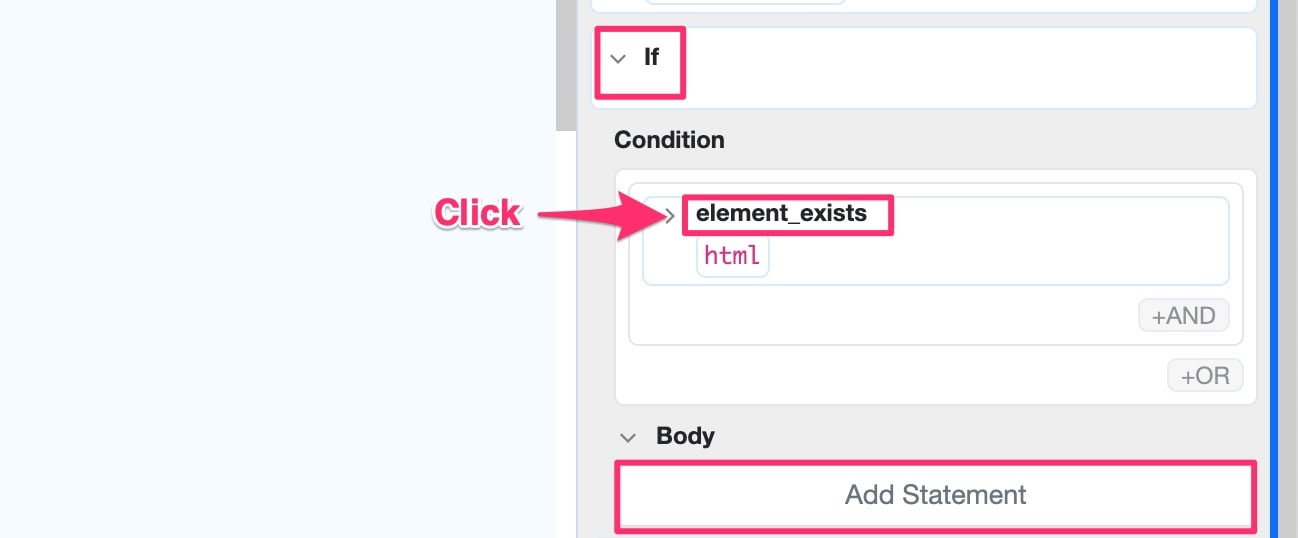
- Add logic with AND / OR and include your step in the body by clicking add statement.
There is a provision to “Add clause” in Macro steps. This gives you the ability to check for multiple conditions when each condition leads to a different outcome of steps. Follow these steps to add a clause with an ELSE…IF
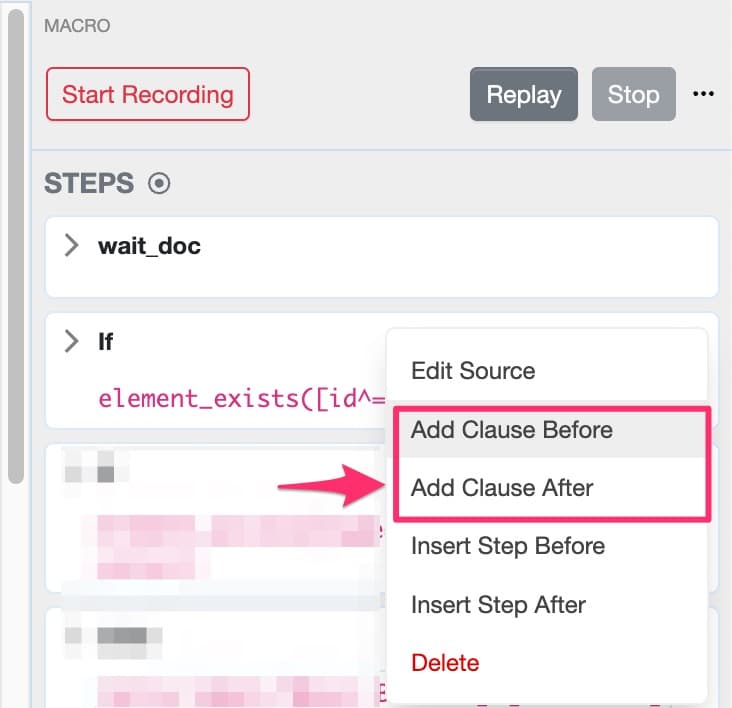
- Click on the overflow button and pick the option to Add Clause, before or after wherever applicable.
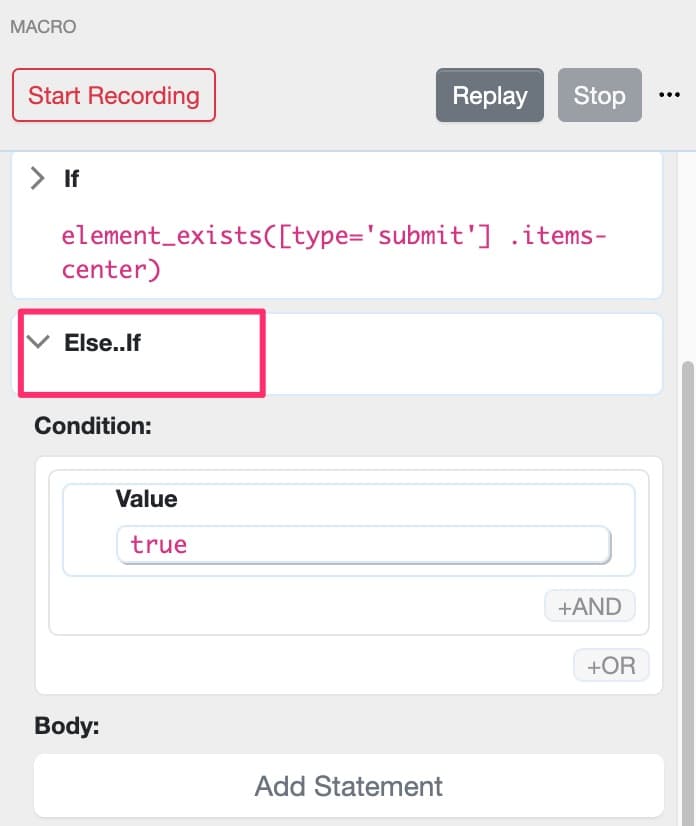
- You can club the ELSE…IF with an IF block when you are checking for multiple scenarios.
How to use Assert expression in the Macro recorder?
Assert expression is used for error-checking during the macros execution.
- Use assert to verify the webpage’s expected behavior when the macro steps are being executed.
- If an assertion fails due to any missing response to the step in the macro, it will raise an exception to halt execution of next steps.
- Assert will error out the monitor with an error code
E_ASSERT.
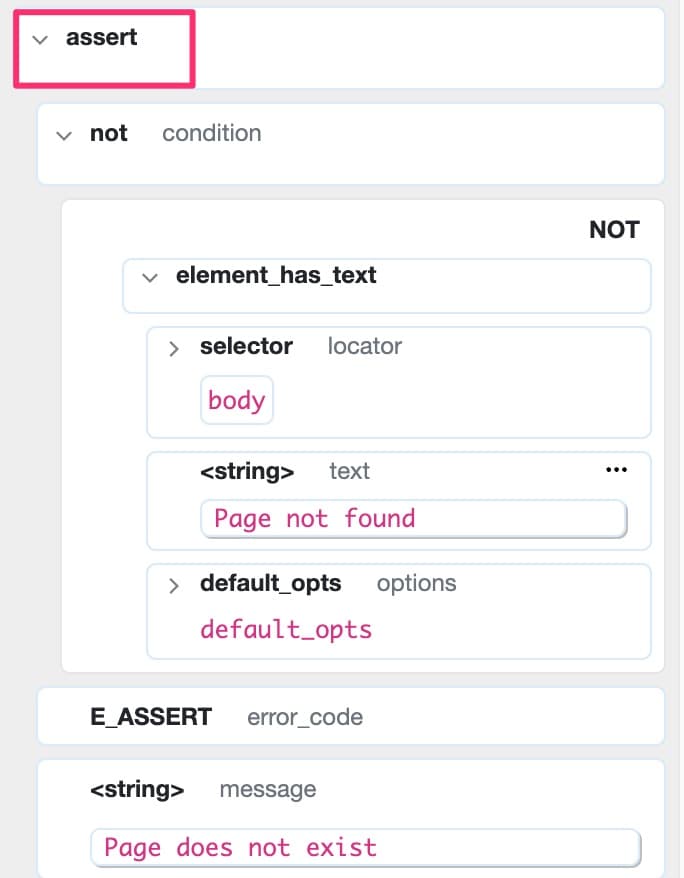
For example, verifying if a page exists before beginning to check any section inside it.
For this, use the “Assert” expression in the Macro steps to check if the page contains the text like “404” or “Page not Found”. If the page does contain this text, we will assert an error with the message “Page does not exist”.
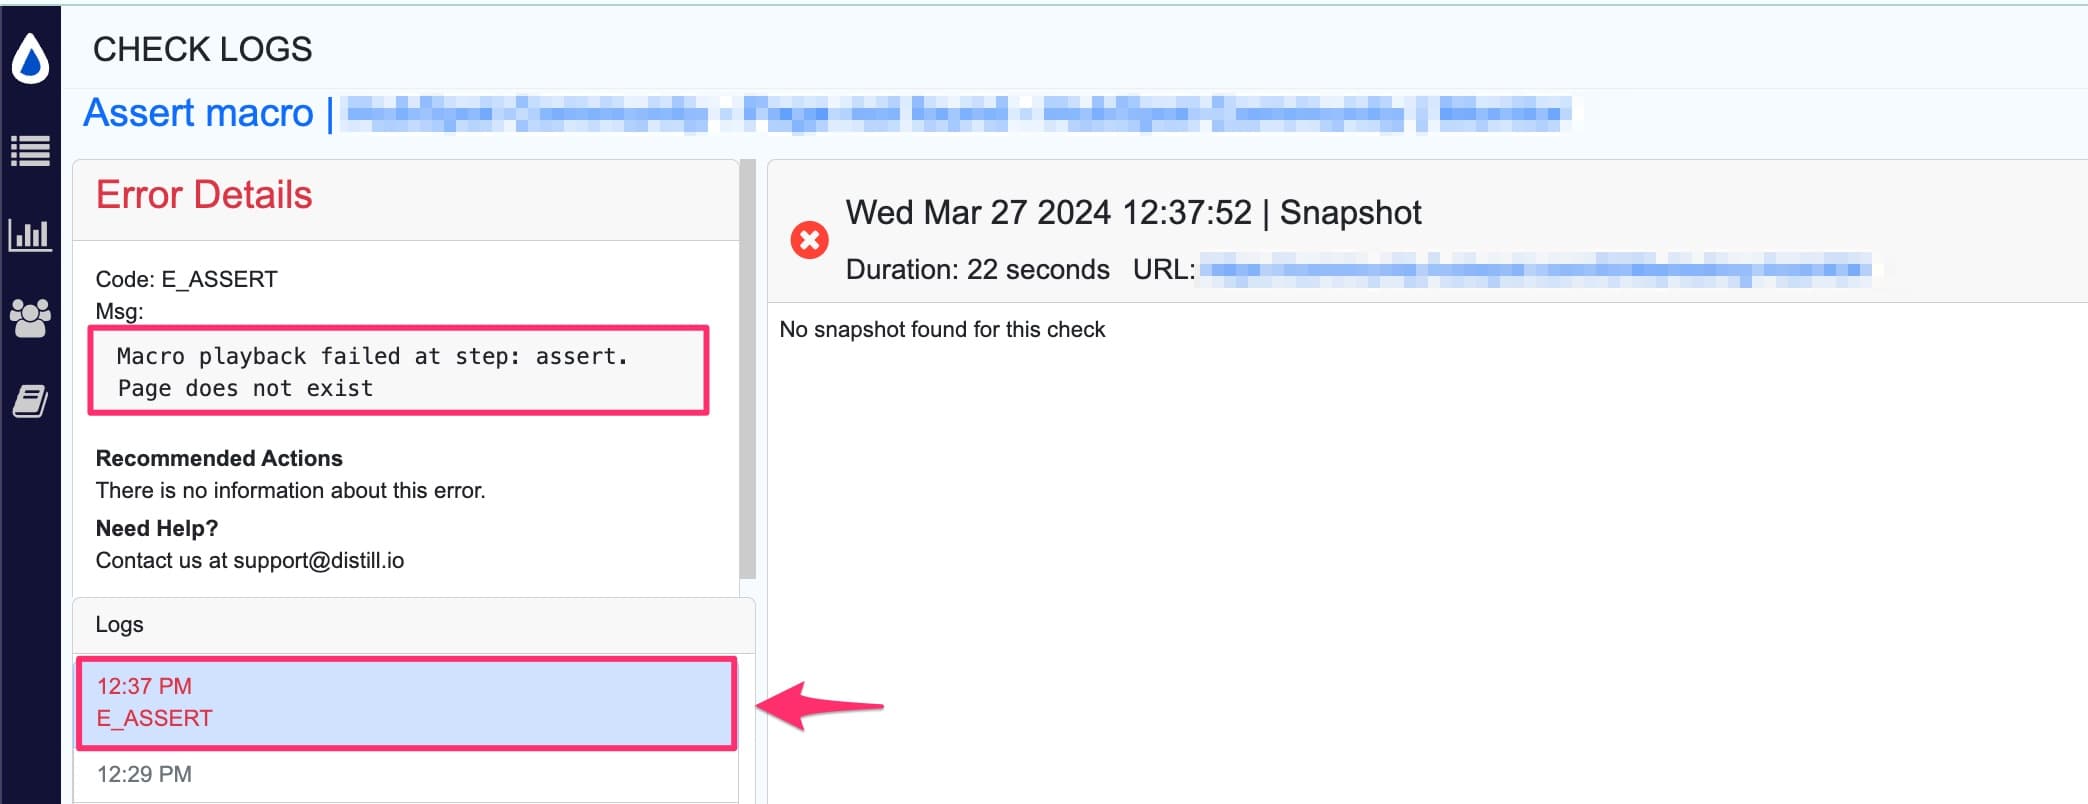
When you run the monitor, and page is not found, the macro will assert an error and stop further checks from executing.
What are Loops in Macros?
Loops in macros allow you to automate repetitive tasks by repeatedly executing a block of actions. There are two primary types of loops that you can use in Distill macros: For Loops and While Loops. Each serves different purposes depending on the nature of the repetition and the conditions under which the loop should run.
For Loops
For loops are used to iterate over a set of values or elements. They are particularly useful when you need to perform an action a specific number of times or over an array of elements. In Distill, you can use For Loops in several ways:
- Iterate over elements: If a webpage has multiple similar elements (like items in a list or tags), you can set a For Loop to perform actions on each element one by one.
- Iterate using a range: You can specify a range with the
range()function to execute the loop a certain number of times. This is handy for tasks such as clicking a button multiple times or navigating through pagination by incrementing page numbers.
While Loops
While Loops evaluate a condition before each iteration, and the loop continues until the condition is no longer true. This type of loop is ideal for situations where the number of iterations isn’t known in advance and must be determined dynamically. For example, you might use a While Loop to continue clicking a “Load More” button until it no longer appears on a webpage.
How to add Loops in Macro steps
Steps to add a While Loop in the Macro recorder:
-
Select the action you wish to loop. A drop-down menu will appear. Choose
while loopfrom the list.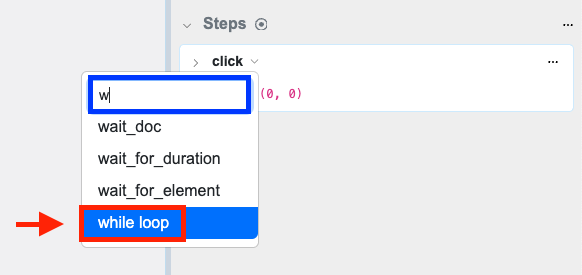
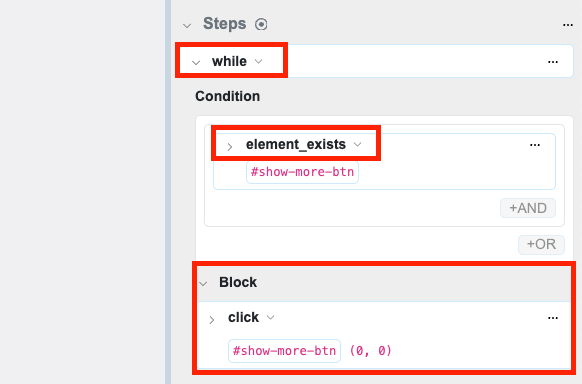
-
A
whileblock will be added. Expand the drop-down menu by clicking the caret text to view and set the loop’s conditions. Incorporate logic withAND / ORcommands, and include your step in the loop by selecting Add statement.
Steps to add For loop in the Macro recorder:
-
Select the action where you want to introduce a loop. A drop-down menu will appear. Choose
for loop.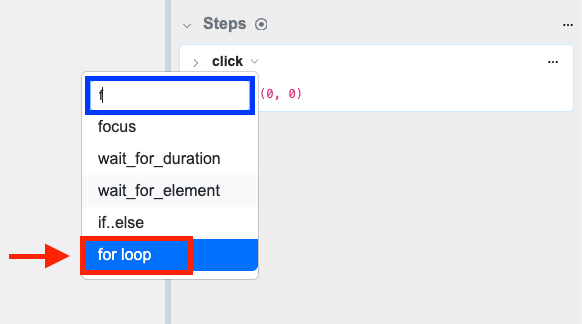
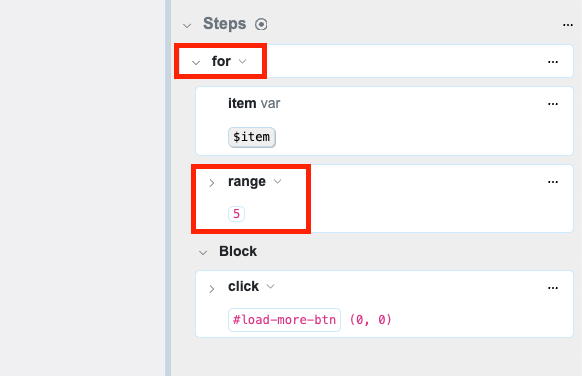
-
A for block will be created. Expand this block by clicking the caret text to access and set up the iterator options.
-
To execute the loop a predetermined number of times, utilize the
rangefunction. For example, to repeat an action five times, userange(5). This sets the loop to execute the body’s steps five times, assigning the iterator variable values from 0 to 4 on each iteration.
- To cycle through a collection of elements matching a specific selector, choose a selector as the iterator. The loop will then process the steps in the body for each element found by the selector. The iterator variable will be assigned the selector for each element during each iteration.
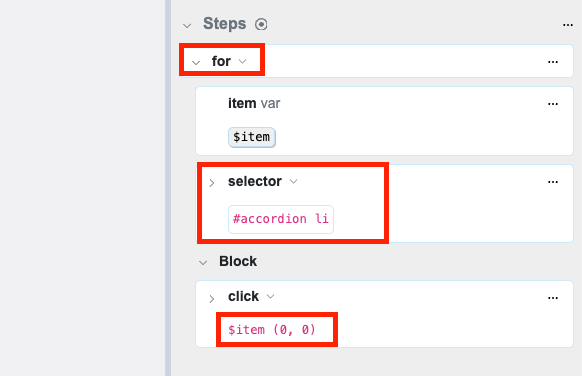
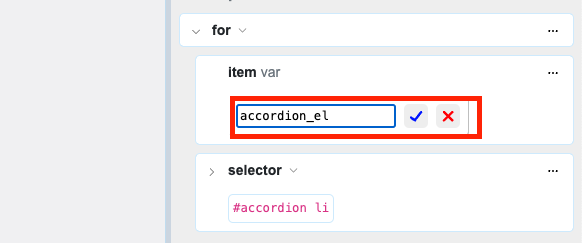
Note: By default, the loop’s iterator variable is named item, but it can be renamed as needed.
Steps and their descriptions
- CLICK (
click): Simulates a mouse click on a specified element, such as a button or a link, triggering any associated actions or events. - DRAG (
drag): Replicates a drag-and-drop action by clicking, holding, and moving an element from one location to another within the browser. - FOCUS (
focus): Sets the focus on a specified element, like an input field or a dropdown menu, making it the active target for user interactions. - KEYPRESS (
keypress): Simulates a keyboard key press event on a focused element, such as typing a letter or pressing Enter. - MOUSEMOVE (
mousemove): Mimics the movement of the mouse pointer over a specified element, triggering any related hover effects or events. - OPEN (
open): Opens a specified URL in the browser, navigating to the desired web page. - SCROLL (
scroll): Scrolls the browser window to a specified position or element, bringing the target into view. - SELECT (
select): Selects an option within a dropdown menu or similar element, making it the active choice. - TYPE (
type): Simulates typing text into a focused input field, such as a text box or search bar. - WAIT_DOC (
wait_doc): Pauses the macro execution until the web page’s content is fully loaded. - WAIT_FOR_DURATION (
wait_for_duration): Introduces a pause in the macro execution for a specified duration of time, typically in milliseconds. - WAIT_FOR_ELEMENT (
wait_for_element): Waits for a specified element to become available on the web page before proceeding with the macro execution.
Troubleshooting & how to check if a Macro is working correctly
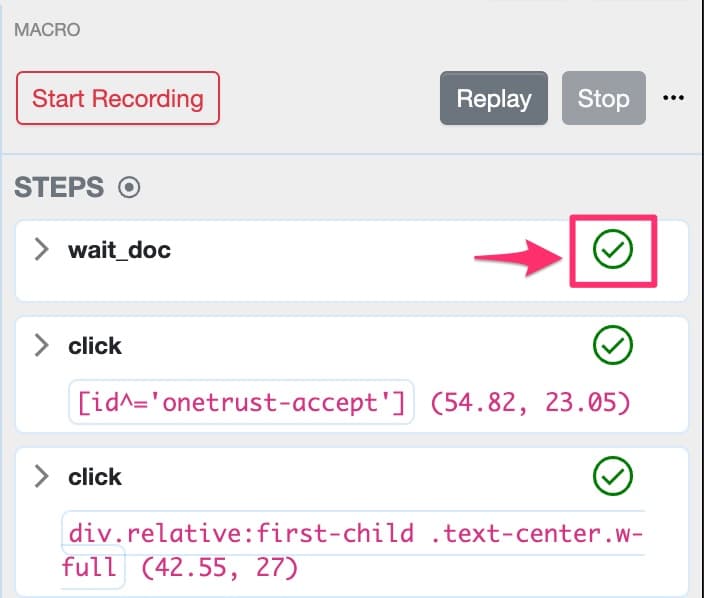
When you replay a Macro, the sequence of steps will execute and successfully executed steps will have a green check mark. If a Macro is working correctly you will see a green check mark against all the recorded steps.
Macros error out usually when:
- The page didn’t load correctly.
- The page loads correctly but the page is a different version of the page that cannot be handled with current recorded steps.
- The page loaded correctly but the elements’ identifiers used to build selectors have changed. The steps fail by not being able to locate the elements correctly.
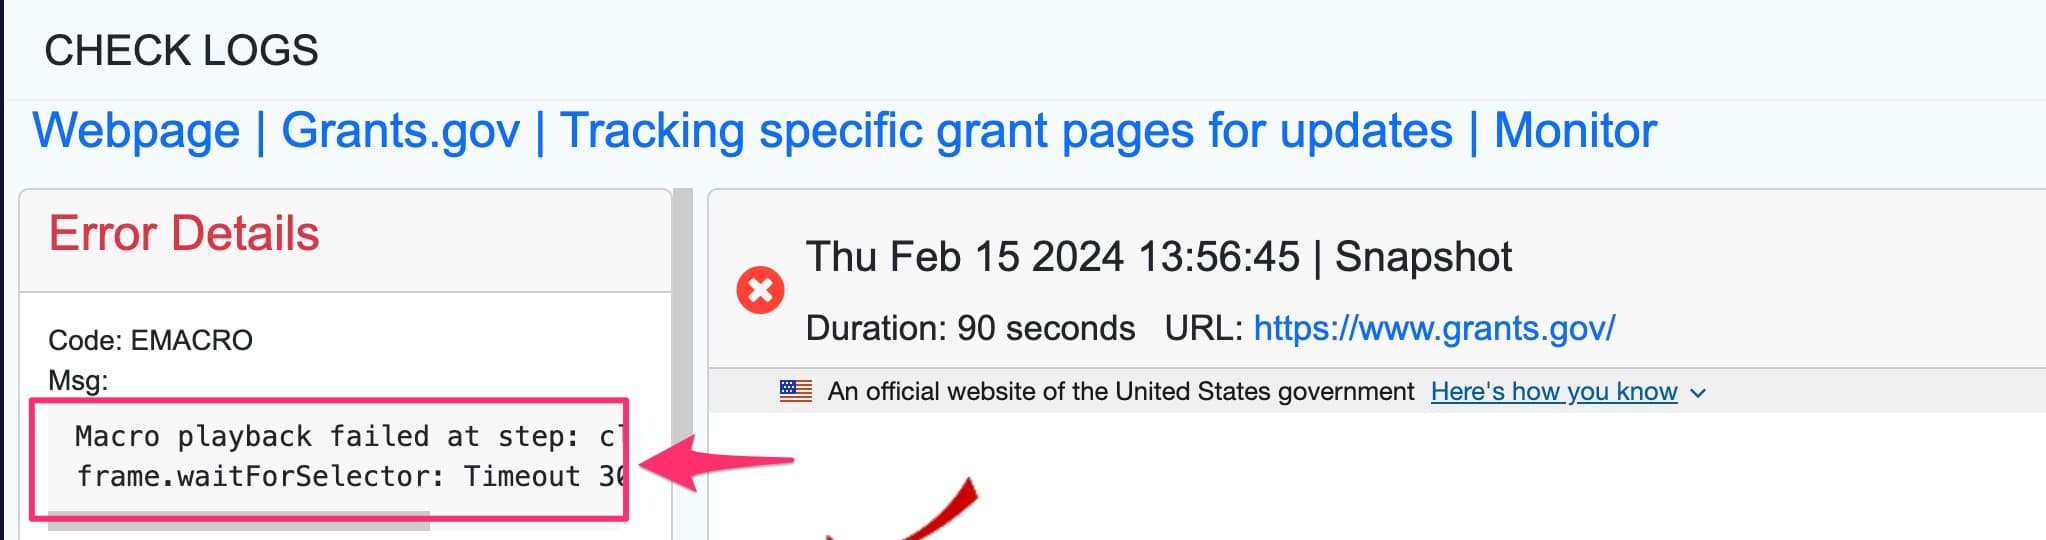
If you encounter an error, you will see that the Macro does not proceed beyond the step that has an issue. If a monitor is associated to a Macro with an issue it will show an EMACRO error message. Click view details to learn more about the issue.

The check log will give you details of where the Macro playback failed and at which step. You can go back to replay the Macro and find out the step with issues and either edit or re-record the step.
Need help?
If you need help with a macro or have a URL that is not handled yet, feel free to contact us using our forum https://forums.distill.io/. You can explore existing discussions or post to get help on any topic.
For instructions on how to import, export, and edit macros on a webpage using JSON refer this video.
Suggested reading
Below are some related resources for more details on how to use conditions within macros:
Video guide to check login status of page using conditions in Macros.
Video tutorial to use conditional IF block to handle infrequent Pop-ups while adding Macros steps.
Discussion thread on Conditions in Macros for further reading.